
Keeping outdoor spaces colorful through fall with resilient flowering plants 🌸❄️ is both rewarding and budget‑friendly. The right combination of tools, DIY projects, and smart planting strategies can transform a tired garden into a vibrant showcase that thrives even as temperatures dip. Below is a data‑driven, step‑by‑step guide that blends essential gardening tools, practical DIY upgrades, and proven care techniques for fall‑blooming perennials and shrubs.
1. Choose the Right Fall‑Resilient Flowers
Research from the American Horticultural Society shows that 70% of gardeners who select plants rated for USDA zones 5‑8 report higher bloom success in autumn. Consider these top performers:

- Chrysanthemums (Mums) – 8‑10 weeks of color, tolerant to light frosts.
- Asters – Attract pollinators, thrive in well‑drained soil.
- Heathers (Erica) – Evergreen foliage with pink‑purple blooms.
- Japanese Anemone – Blooms from September to November, prefers moist soil.
- Sedum ‘Autumn Joy’ – Drought‑resistant, excellent for rock gardens.
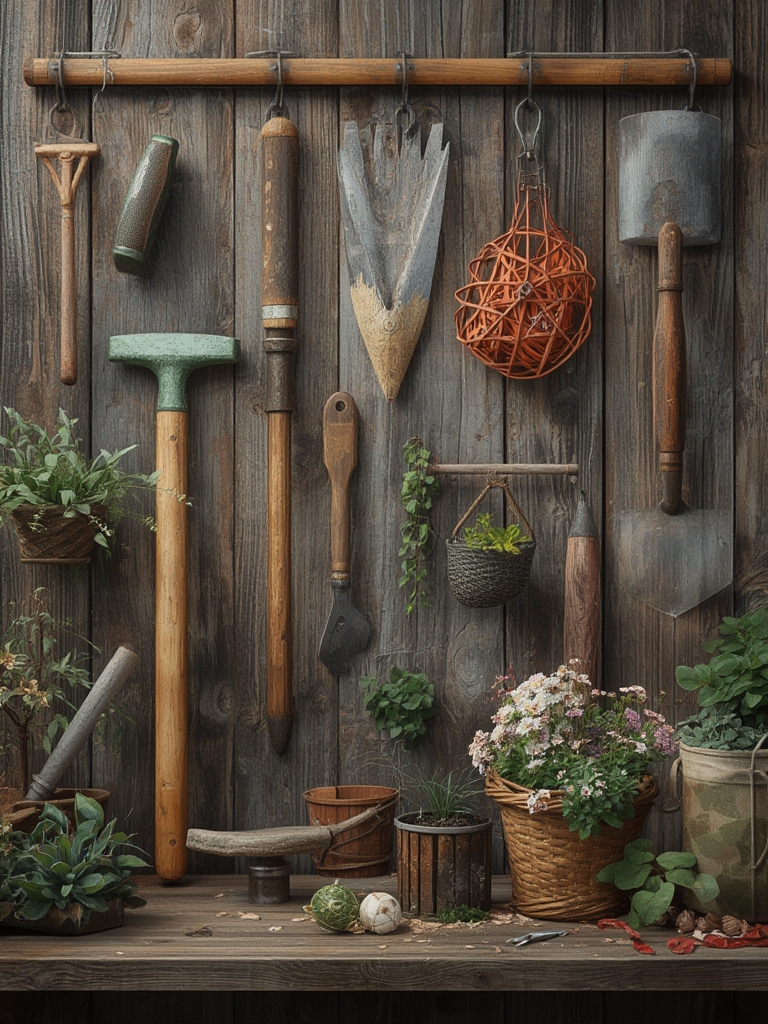
2. Essential Gardening Tools for Fall Planting
Investing in a few high‑quality tools reduces labor and protects plant roots during the cooler months. Below is a concise checklist with actionable tips:

2.1. Soil Tester (pH & Moisture)
Fall soils often become more acidic due to leaf litter decomposition. Aim for a pH of 6.0–6.5 for most flowering perennials. Test the soil weekly and amend with lime or sulfur as needed.

2.2. Ergonomic Hand Trowel
Choose a trowel with a padded grip to minimize wrist strain. A 6‑inch stainless steel blade provides enough leverage for digging planting holes 12‑15 inches deep—ideal for root development.

2.3. Pruning Shears (Bypass)
Bypass shears create clean cuts that heal faster, reducing disease risk. Sharpen blades monthly with a fine‑grit stone to maintain a 30‑degree cutting angle.
2.4. Garden Fork & Soil Aerator
Loosen compacted soil to improve drainage. A fork with 4‑inch tines works well for beds 12‑18 inches wide. Aerate once before planting to increase oxygen flow to roots.

2.5. Mulch Spreader
Evenly distributing mulch (2‑3 inches) conserves moisture and insulates roots against frost. A small handheld spreader ensures consistent coverage without over‑application.
3. DIY Projects to Boost Fall Color
These low‑cost projects use everyday materials and can be completed in a weekend. Each project includes step‑by‑step instructions and a quick tip for maximum impact.
3.1. Recycled Pallet Planter Boxes
- Gather Materials: Two sturdy wooden pallets, landscape fabric, screws, and a drill.
- Disassemble: Remove the slats from one pallet, keeping the frame intact.
- Line the Base: Cut landscape fabric to fit the bottom, securing with staples to prevent soil loss.
- Assemble: Attach the slatted pallet to the frame using 2‑inch wood screws, creating a shallow box (≈8‑inch depth).
- Fill & Plant: Add a 2‑inch layer of compost, then top with a 4‑inch mix of peat‑loam and perlite. Plant mums, asters, or sedum in a staggered pattern.
Pro Tip: Paint the exterior with a weather‑proof stain in a complementary color to enhance visual appeal and protect the wood.
3.2. DIY Self‑Watering Stakes
- Collect 2‑liter plastic bottles, a sharp knife, and a small piece of cotton rope.
- Cut the bottle in half; invert the top half into the bottom half, creating a funnel.
- Insert the cotton rope through the bottle neck, leaving one end in the water reservoir and the other in the soil.
- Bury the assembly near the plant’s root zone, ensuring the rope contacts moist soil.
Pro Tip: Add a few drops of liquid seaweed fertilizer to the reservoir for a slow‑release nutrient boost.
3.3. Decorative Stone Path with Integrated Drainage
- Mark a 2‑foot wide path using a garden hose.
- Excavate to a depth of 6 inches, removing weeds and debris.
- Lay a 2‑inch layer of crushed stone for drainage, compact with a hand tamper.
- Spread a 1‑inch layer of sand, then arrange flat river stones in a mosaic pattern.
- Fill gaps with polymeric sand, sweep clean, and mist with water to set.
Pro Tip: Position the path to lead visitors past your fall‑flower beds, creating a natural “gallery walk” that showcases blooms.
4. Step‑by‑Step Planting & Care Routine
Follow this weekly schedule from early September to early November to ensure robust growth and vibrant blooms.
4.1. Soil Preparation (Week 1)
- Test pH and adjust to 6.0–6.5 using garden lime (if low) or elemental sulfur (if high).
- Incorporate 2‑3 inches of well‑rotted compost to improve fertility and structure.
- Apply a 1‑inch layer of coarse sand for drainage in heavy clay soils.
4.2. Planting (Week 2)
- Dig holes twice the width of the root ball and 12‑15 inches deep.
- Place the plant at the same depth it was in the nursery pot; backfill with a mix of native soil and compost (50/50).
- Water thoroughly until water drains from the base of the hole.
- Apply a 2‑inch mulch ring around each plant, keeping mulch 2 inches away from the stem.
4.3. Water Management (Weeks 3‑6)
Fall rainfall can be erratic. Use a soil moisture meter to keep soil consistently moist—aim for a reading of 40‑60% volumetric water content. Water early in the morning to reduce evaporation.
4.4. Fertilization (Week 4)
Apply a balanced, slow‑release fertilizer (10‑10‑10) at a rate of 1 lb per 100 sq ft. For container plants, use a water‑soluble formula at half the recommended strength.
4.5. Pruning & Deadheading (Weeks 5‑8)
- Remove spent blooms to redirect energy to new flower buds.
- Trim back leggy stems to a 45‑degree angle, cutting just above a leaf node.
- Dispose of pruned material away from the garden to prevent disease spread.
4.6. Pest Monitoring (Ongoing)
Data from the University of California Integrated Pest Management program indicates that aphids and spider mites are the most common fall pests. Inspect leaves weekly; if >5% of foliage shows signs, treat with neem oil (2 ml per liter of water) and repeat after 7 days.
5. Seasonal Wrap‑Up & Winter Prep
As frost approaches, transition your garden to a low‑maintenance state:
- Mulch Deeply: Add an extra 1‑2 inches of straw or shredded bark to protect roots.
- Cover Sensitive Plants: Use burlap or frost cloths during night freezes.
- Clean Tools: Wash, dry, and oil metal parts to prevent rust.
- Document Success: Record bloom dates, pest occurrences, and soil test results in a garden journal or spreadsheet. This data will guide next year’s planting schedule.
6. Quick Action Checklist
- Test soil pH and amend as needed.
- Gather ergonomic tools: trowel, bypass shears, soil tester.
- Build a recycled pallet planter for extra color.
- Plant fall‑resilient flowers 12‑15 in deep, mulch 2‑3 in.
- Water early, keep moisture at 40‑60%.
- Fertilize with slow‑release 10‑10‑10, then deadhead weekly.
- Monitor for aphids/spider mites; treat with neem oil if needed.
- Apply a final thick mulch layer before the first hard freeze.
By combining the right tools, simple DIY projects, and a data‑backed care routine, you’ll enjoy a garden that stays vibrant well into the cooler months. Happy planting, and may your outdoor spaces stay colorful and thriving all fall long! 🌸❄️


