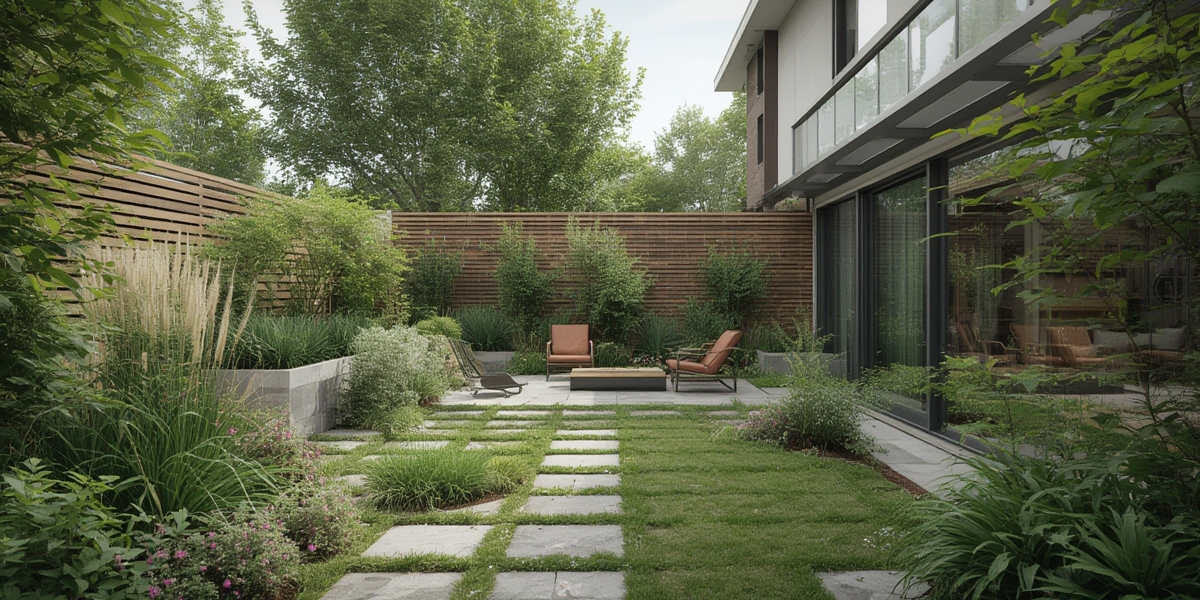
Creating a garden that feels both contemporary and welcoming often starts with the edges. Modern garden borders that look clean and elegant can instantly upgrade a simple backyard into a stylish outdoor retreat. For beginner gardeners, the idea of adding precise borders might seem daunting, but with the right materials, a clear plan, and a few practical tips, you’ll be able to shape tidy, sophisticated lines that enhance every plant and pathway. This guide walks you through everything you need to know—from choosing the perfect material to avoiding common pitfalls—so you can enjoy a polished garden without stress.
Why Choose Modern Garden Borders?
Modern garden borders do more than just separate flower beds from lawns; they serve several important functions that benefit both the garden’s appearance and its health.
- Visual clarity: Clean lines create a sense of order, making the garden feel larger and more intentional.
- Weed control: A well‑installed border reduces the chance of weeds spilling over into your planting areas.
- Soil retention: Borders keep soil in place, especially on sloped beds, preventing erosion.
- Low maintenance: Durable materials require minimal upkeep, freeing you to focus on planting and enjoying your space.
Materials for Clean and Elegant Borders
Choosing the right material is the foundation of a sleek look. Below are the most popular options for beginners, along with their pros and cons.
Metal Edging
Steel or aluminum strips provide a thin, unobtrusive line that blends well with modern design. They’re easy to bend around curves and can be driven into the soil with a mallet.
- Pros: Minimal visual impact, long‑lasting, resistant to rot.
- Cons: Can be pricey; sharp edges need careful handling.
Concrete or Stone Pavers
Flat pavers create a solid, defined edge that feels substantial. Choose rectangular or square shapes for a geometric look.
- Pros: Extremely durable, excellent for high‑traffic areas.
- Cons: Heavier to install; may require a base layer of sand or gravel.
Wooden Boards
Reclaimed timber or pressure‑treated boards give a warm, natural contrast to sleek plantings. When painted or stained in neutral tones, they maintain a modern vibe.
- Pros: Affordable, easy to cut to size, can be painted.
- Cons: Susceptible to rot if not properly sealed; may need replacement after several years.
Plastic or Composite Edging
These flexible strips snap together and are designed for easy DIY installation. Look for UV‑stabilized versions to keep colors from fading.
- Pros: Lightweight, inexpensive, simple to install.
- Cons: Less sturdy than metal or stone; can become brittle over time.
Design Ideas for a Polished Look
Once you’ve selected a material, consider these design strategies to ensure your borders truly embody a clean and elegant aesthetic.
Geometric Patterns
Straight lines and right angles are hallmarks of modern design. Use rectangular pavers or metal strips to create rectangular or square beds that repeat across the garden.
Low‑Profile Edging
For a subtle effect, keep the border height under 2 inches. This maintains a sleek silhouette while still providing a functional barrier.
Monochrome Color Schemes
Stick to a single color family—such as matte black metal or white concrete—to keep the visual field uncluttered. If you prefer a touch of warmth, a light gray wood stain works beautifully.
Integrated Lighting
Embedding low‑voltage LED strips along the top edge of a stone or metal border adds a soft glow after dark, enhancing the clean lines without overwhelming the space.
Step‑by‑Step Guide to Installing Your Border
Follow these straightforward steps to achieve modern garden borders that look clean and elegant without professional help.
- Plan the layout: Sketch your garden on graph paper or use a free garden‑design app. Mark where each border will run and measure the total length.
- Mark the line: Use a garden hose, string, or spray paint to create a visible guide on the ground.
- Prepare the trench: Dig a shallow trench 2–3 inches deep and about ½ inch wider than your chosen material. For stone or concrete, a deeper trench (3–4 inches) provides extra stability.
- Level the base: Add a thin layer of compacted sand or fine gravel to create a level foundation. Use a hand tamper to firm it down.
- Place the edging: Insert metal strips, lay pavers, or set wooden boards into the trench. Tap gently with a rubber mallet to ensure a snug fit.
- Backfill: Fill the space on either side of the border with soil, pressing firmly to eliminate gaps.
- Secure corners: For metal or plastic edging, use the supplied connectors or brackets. For wood, drive a few small stakes at each corner for extra hold.
- Finishing touches: Sweep away excess soil, water the beds, and step back to admire the clean line you’ve created.
Practical Tips for Long‑Lasting Results
Even the most elegant border can lose its charm if not cared for properly. Keep these tips in mind to preserve the sleek appearance.
- Regular cleaning: Remove debris and leaf litter from the border surface to prevent staining.
- Check for movement: After heavy rain, inspect the edging for any shifts and re‑secure as needed.
- Seal wood: Apply a fresh coat of sealant or stain every 2–3 years to protect against moisture.
- Prevent rust: If using metal, choose galvanized or powder‑coated options and touch up any scratches promptly.
- Mind the roots: When planting near a border, avoid overly aggressive root systems that could push the edging outward.
Common Mistakes to Avoid
Even seasoned gardeners can slip up. Here are the pitfalls that often undermine the clean, elegant look you’re aiming for.
Uneven Depth
Digging a trench that’s too shallow causes the border to sit above ground, creating a noticeable gap. Conversely, a trench that’s too deep can bury the edge, making it invisible. Aim for a consistent depth that matches the material’s thickness.
Skipping the Base Layer
Placing edging directly on soil leads to settling and wobbling over time. A compacted sand or gravel base provides stability and helps maintain a level line.
Overcrowding Plants
Planting too close to the border can cause foliage to smother the edge, making it look messy. Leave at least a few inches of space between the plants and the border to preserve the clean silhouette.
Ignoring Expansion Gaps
Materials like concrete expand in hot weather. If you install pavers without a small gap (about ¼ inch), they may crack or lift. Use a flexible joint filler for a seamless finish.
Choosing the Wrong Material for the Site
Heavy stone in a small, shaded garden can feel overwhelming, while delicate metal may not hold up in high‑traffic areas. Match the material’s durability and visual weight to the garden’s size and usage.
Conclusion
With the right material, thoughtful design, and careful installation, modern garden borders that look clean and elegant are well within reach for any beginner gardener. By following the step‑by‑step guide, applying practical maintenance tips, and steering clear of common mistakes, you’ll create crisp, timeless lines that highlight your plants and pathways. The result? A garden that feels both contemporary and inviting—perfect for relaxing, entertaining, and watching your green space flourish for years to come.