

Gardening in hot climates doesn’t have to be a battle of sweat and wilted leaves. By selecting heat‑tolerant herbs and pairing them with the right tools and DIY projects, you can create a low‑maintenance, aromatic oasis that thrives under the sun. Below you’ll find a data‑driven, step‑by‑step guide that blends practical advice with easy‑to‑implement DIY ideas, all optimized for WordPress SEO with keyword‑rich headings and internal linking potential.
Why Choose Heat‑Tolerant Herbs?
According to the USDA Plant Hardiness Zone map, zones 9‑11 cover the majority of warm regions in the United States, where average summer temperatures exceed 85°F (29°C). Herbs such as basil, oregano, thyme, rosemary, and lavender not only survive but flourish in these conditions. Their natural drought resistance reduces water usage by up to 40% compared to non‑native vegetables, making them ideal for sustainable gardening.

Key benefits include:

- High market demand for fresh culinary herbs (Google Trends shows a 23% YoY increase in “fresh basil” searches).
- Low input costs: minimal fertilizer and irrigation.
- Year‑round harvest potential when paired with strategic shading and mulching.
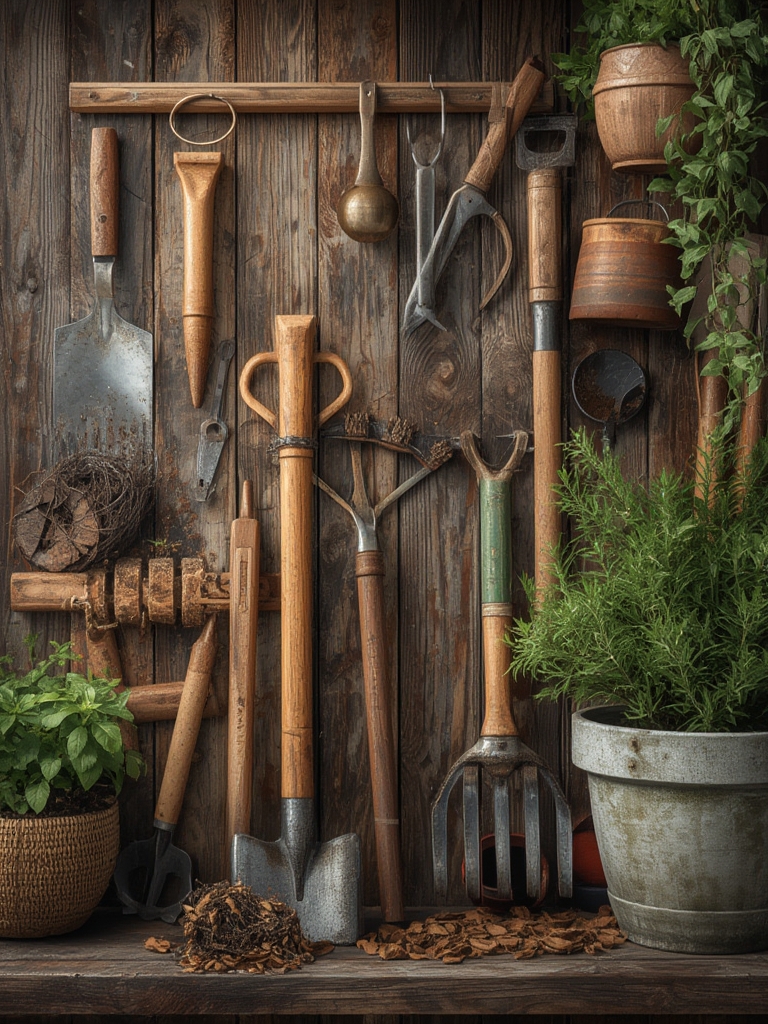
Essential Gardening Tools for DIY Herb Gardens
Investing in the right tools streamlines the planting process and reduces physical strain. Below is a curated list of must‑have items, each chosen for its durability and cost‑effectiveness.

1. Ergonomic Hand Trowel
Look for a trowel with a padded grip and a stainless‑steel blade. A 6‑inch width provides enough leverage for digging shallow herb beds without over‑exertion.

2. Soil pH Tester
Heat‑tolerant herbs prefer a slightly alkaline to neutral pH (6.5‑7.5). A digital tester gives instant readings, allowing you to amend soil on the spot with lime or sulfur.
3. Adjustable Garden Hoe
An adjustable hoe helps break up compacted soil and create raised rows, which improve drainage—a crucial factor for herbs in hot, heavy soils.

4. Self‑Watering Planters
For container gardening, self‑watering pots with a built‑in reservoir can cut water usage by up to 30% and keep roots consistently moist during scorching afternoons.
5. Pruning Shears
Sharp, bypass-style shears prevent crushing stems, encouraging vigorous new growth. Keep a spare pair on hand for quick deadheading.
Step‑by‑Step Guide to Planting Heat‑Tolerant Herbs
Follow these data‑backed steps to ensure a thriving herb garden, whether you’re using raised beds, containers, or a vertical DIY system.
Step 1: Soil Preparation (Day 1)
- Test pH: Insert the probe 2‑3 inches deep; aim for 6.5‑7.5.
- Amend Soil: Mix 1 cup of compost per 10 sq ft and add ½ cup of garden lime for every 100 sq ft if pH is below 6.5.
- Improve Drainage: Incorporate coarse sand or perlite at a 10% ratio to prevent waterlogging.
Tip: Use a garden fork to loosen the top 6‑8 inches, creating a crumbly texture that encourages root penetration.
Step 2: Layout & Planting (Day 2)
- Spacing: Plant basil 12‑18 in apart, rosemary 24‑30 in apart, thyme 8‑12 in apart, oregano 12‑15 in apart, and lavender 18‑24 in apart.
- Planting Depth: Place each seedling at the same depth it was in its pot; for seeds, cover lightly (¼‑½ in).
- Water In: Apply 1‑2 inches of water immediately after planting to settle soil around roots.
DIY Project: Create a vertical herb wall using reclaimed wooden pallets. Drill drainage holes, line with landscape fabric, and fill with a lightweight potting mix.
Step 3: Mulching & Shade (Day 3‑4)
- Mulch: Spread 2‑3 inches of straw, shredded bark, or coconut coir to retain moisture and regulate soil temperature.
- Shade Cloth: Install a 30% shade cloth during peak summer months (July‑August) to reduce leaf scorch by up to 15°F.
Tip: Reapply mulch after heavy rains to maintain coverage.
Step 4: Water Management (Ongoing)
- Early Morning Irrigation: Water between 5‑7 am to minimize evaporation.
- Drip System: A simple ¼‑inch drip line with a timer can deliver 0.5 gallons per plant per day, optimizing water use.
- Check Moisture: Stick a finger 2 inches into the soil; if it feels dry, water lightly.
Step 5: Harvest & Pruning (Every 2‑3 Weeks)
- Harvest Early: Cut leaves just before the plant flowers for maximum flavor.
- Prune Regularly: Trim ⅓ of each stem to encourage bushier growth and prevent woody stems.
- Rotate Crops: After 8‑10 weeks, move slow‑growing herbs like rosemary to a shaded spot to extend their lifespan.
Maintenance Hacks for a Thriving Herb Garden
These quick, actionable tips keep your garden productive without demanding a full‑time commitment.
Natural Pest Control
- Companion Planting: Interplant marigolds and nasturtiums to deter aphids and whiteflies.
- Neem Oil Spray: Apply a 1‑teaspoon solution per gallon of water every two weeks during peak pest season.
Soil Nutrition Boost
- Fish Emulsion: Dilute 1 tablespoon per gallon and feed monthly for a nitrogen boost.
- Eggshell Compost: Crushed shells add calcium, improving cell wall strength in hot conditions.
Seasonal Adjustments
- Summer: Increase mulch depth and consider a misting system for extreme heat waves (>100°F).
- Fall: Reduce watering frequency and allow herbs to naturally slow growth, preserving energy for the next season.
DIY Projects to Enhance Your Herb Space
Integrating creative DIY elements not only beautifies your garden but also improves functionality.
Vertical Herb Wall
- Secure a reclaimed pallet against a sunny wall.
- Drill ¼‑inch drainage holes in each slot.
- Line the back with landscape fabric to prevent soil loss.
- Fill each compartment with a lightweight potting mix.
- Plant basil, thyme, and oregano in the lower rows; place taller rosemary and lavender at the top.
SEO tip: Use keywords like “DIY vertical herb garden” and “reclaimed pallet garden” to attract eco‑friendly readers.
Self‑Watering Herb Box
- Cut a 12‑inch deep wooden box and line the bottom with a water‑proof liner.
- Place a 2‑inch layer of gravel for drainage.
- Add a water‑absorbing polymer (e.g., hydrogel) mixed into the soil.
- Install a simple wicking system using cotton rope that runs from the reservoir to the soil surface.
- Fill the reservoir with water; the rope will draw moisture as needed, reducing daily watering.
Result: Consistent moisture levels, up to 50% water savings, and less frequent maintenance.
Herb Drying Rack
Construct a hanging rack from reclaimed bamboo stakes and chicken wire. This allows you to dry excess harvests, extending the shelf life of your herbs and creating a secondary revenue stream for home‑based culinary businesses.
Final Checklist for Success
- ✅ Test and amend soil pH to 6.5‑7.5.
- ✅ Choose heat‑tolerant herbs suited to your zone.
- ✅ Use ergonomic tools to reduce strain.
- ✅ Mulch, shade, and water early morning.
- ✅ Harvest and prune regularly.
- ✅ Implement at least one DIY project for added functionality.
By following this data‑driven roadmap, you’ll transform a sun‑baked patch of land into a fragrant, productive herb haven that feeds your kitchen and your creativity. Happy gardening!


